Uninstall Tool

2013-12-31

Can’t Uninstall PC Clean Pro Completely - How Can I Remove PC Clean Pro Effectively from Windows 7?

Can't uninstall PC Clean Pro completely with its built-in uninstaller? Are you tired trying to remove PC Clean Pro since it is corrupted, crashing or freezing in your computer? In fact, it is complex to delete PC Clean Pro from your PC. When you decide to get rid of it, you have to fully delete the program. The related files will be stored around the Windows system. And the leftover extensions and registry files will definitely cause your system errors. And they will make your computer work unstably. Thus, you need to learn the uninstall tips about how to thoroughly uninstall PC Clean Pro from your PC as following.

Do you know how to normally Uninstall PC Clean Pro from Windows?

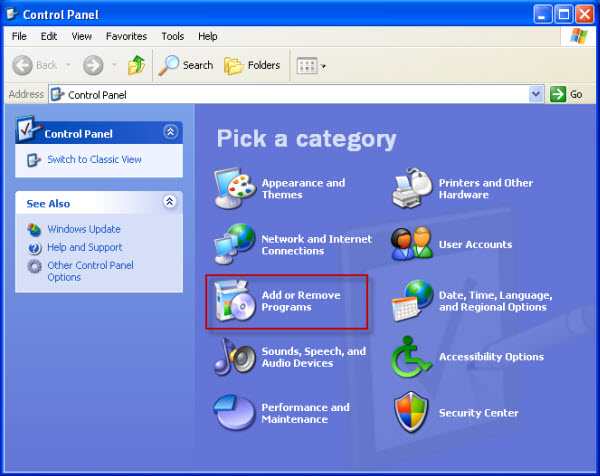
Most of you would like to uninstall PC Clean Pro in standard way which is using “Add or Remove Programs” in Windows XP or “Programs and Features” in Win 7 or Windows Vista. You can click “Start” menu and then go to the Control Panel. Next, you enter the “Add or Remove Programs” or “Programs and Features”. What’s more, you will find out the PC Clean Pro on the program list and click the “Remove” button. After you finish the processes, the program will be uninstalled from Control Panel. However, the removal instructions have not been completed. There are PC Clean Pro related files and extensions are stored all around your hard disk. You can not delete them by using Control Penal. So, you might have no idea to fix this uninstall problem. Fortunately, you can clean up the Windows registry entries to make sure the PC Clean Pro has been fully uninstalled. It is so complicated for most of users to handle the registry data so that it not recommended you to remove PC Clean Pro manually. Thus, you should try another PC Clean Pro removal way which is the best and fastest way to totally remove PC Clean Pro from your computer.

Special PC Clean Pro removal guides

Step 1: Download and Install Perfect Uninstaller.
Step 2: Find and locate PC Clean Pro in the programs list. Or you can find the location that you installed PC Clean Pro and you force uninstall it.
Step 3: Click “Uninstall” button to get rid of PC Clean Pro.
Can’t remove PC Clean Pro? Use Perfect Uninstaller Now!

2013-12-27

I can’t uninstall LibreOffice from Windows – How to fully remove LibreOffice from my PC?

Are you trying to uninstall LibreOffice and upgrade it to a new version on Windows?
Do you have confidence to totally remove LibreOffice from your Windows? When you try to get rid of the program through the Control Panel in Windows, you might get a message telling you that you have to quit the program and it is running. However, the software is not running.
You also tried restarting your computer, and this did not help. You failed because it stubbornly refused to be uninstalled. Fortunately, you can learn how to easily and completely uninstall LibreOffice from your computer with its useful uninstall guides below.
In fact, there might be a bug in the program. Sometimes, it may wrongly assume that the software is running since it might not have permissions needed to remove the existing content. For example, you will see a popup message like shown “Please exit LibreOffice X.X and the LibreOffice X.X. Quickstarter before you continue. If you are using a multi-user system, also make sure that no other user has LibreOffice X.X open.”

How to successfully and fully uninstall LibreOffice from your laptop?

To get rid of the program, you should use the command line in Windows. You need to locate CMD as an administrator. Once it's open, navigate to the folder where you keep the LibreOffice installer for the new version. Most likely, it's going to be an .msi file. Start it from the command line, and then resume the graphical wizard normally. If you're planning on upgrading, you can run the new installer, it will remove the older version, so no need for you to do the hard work twice.
As a matter of fact, the removal guides above might be confused you. And you have no idea to follow the uninstall instructions and delete LibreOffice from Windows.
Thus, comparing with the program uninstall guides above, you can try a much more effective and easier method to totally uninstall LibreOffice. Perfect Uninstaller is specially made to help you completely delete all unwanted programs in your computer with the most powerful function called “Force Uninstall”. With its help, there will be no leftover files and extensions corrupted your system.

Can’t fully uninstall LibreOffice? Use Perfect Uninstaller now!

2013-12-25

Can’t Uninstall Ask Toolbar – How to Uninstall Ask Toolbar from Windows System for Free

Can’t uninstall ask toolbar? You always get corrupted message from ask.com toolbar. This can make your computer running freezing. It slows down your laptop. In order to avoid the troubles like that, you have to fully delete ask toolbar from your browsers.
The Ask Toolbar is said to be a free browser add-on that allows you to search the Web using the Ask.com search engine directly from Internet Explorer or other compatible browsers.

2013-12-19

How to Uninstall Bing Toolbar from Firefox When Firefox Not Able to Remove Bing Toolbar

Having problem to completely uninstall Bing toolbar from Firefox? My aunt has already had enough application toolbar and search engines. And she has installed Bing toolbar by mistakes. In fact, she certainly doesn't need to use Microsoft Bing. Are there any removal guides to show her how to fully delete Bing Search Toolbar if Firefox is not able to remove it? Fortunately, you can know the answer if you can carefully follow the toolbar uninstall instructions below.
Most people would like to remove Bing Toolbar from Firefox with Windows uninstall utility. Thus, you need to follow the step-by-step processes below.
Quit all open Web browsers on your computer, including Firefox or any other browser you have open.
Click “Start” Menu, select “Settings” then select “Control Panel”.
Click “Add\Remove Programs”.
Find the listing for “Bing Bar” and click “uninstall”.
Restart Firefox browser and the Bing Toolbar will be removed.
It should be in your Add/Remove programs but if it's not, you can at least disable it when you're using Firefox.
Enable Firefox’s toolbar.
To do this, right click on the FIREFOX toolbar and enable “Menu Bar”.
Go to the “Tools” menu and select “Manage Add-ons”.
Select/Highlight Bing Toolbar and click on 'Disable', in the lower right.
Close, re-start FIREFOX and you should be all set.
If you are unable completely remove Bing toolbar on Firefox by using “Add/Remove Programs” in your computer's Control Panel or by deploying browser manager, it is highly recommended you to try program uninstall tool. Perfect Uninstaller can be truly helpful to get rid of Bing Toolbar. With Perfect Uninstaller installed and running on your computer, Bing Toolbar should be easily identified as a small icon on its display list. Then, all you have to do is click on the icon to activate a complete removal process for the Bing Toolbar!

Can’t fully uninstall Bing Search Toolbar? Perfect Uninstaller is your best choice!

2013-12-17

Can’t Uninstall Free AVG – How Can You Totally Remove AVG Free Antivirus Software from Your PC (Uninstall Guides)

Are you trying to uninstall free AVG from your computer? But “Add or Remove Programs” can’t delete it. And your computer is freezing.
Do you notice that you can’t uninstall free AVG in Start Menu since you are unable to find the “Uninstall” option in the AVG option?
Do you want to remove free AVG antivirus program and try to use another antispyware? But you are failed to get rid of it.
To delete an application, you have to make sure you can fully and safely remove the leftover related traces. When the program is installed, the related registry files will be stored around your system. So it is difficult to clean up these files. As a matter of fact, there are two ways to computer uninstall free AVG antivirus program. One is normal removal, the other is specific removal. You can learn the detailed removal guides step by step below.

How to completely delete free AVG through the normal way?

At the beginning, as we known, many task processes are automatically running in the background of your system. Thus, you should go to the Windows Safe Mode to remove AVG antivirus program in Windows Control Panel. So you can follow the removal guides below.
Firstly, you should press F8 on the keyboard when you switch on the power. And then, select Safe Mode. After that, press Enter. Next, you need to quit AVG and all processes related to it. And then, you need to click Start Menu, select Control Panel. And locate “Add or Remove Programs”. Next, find and locate the software you want to delete on the programs list. Click “Change/Remove” button. And then, follow the onscreen removal steps.
At this time, most of the files have been deleted. But you have to completely remove the related files in your system. So you should open the Tools menu, select Folder Options, click the View tab, and then choose ‘Show hidden files and folders’ in Explorer to do this. Finally, click Start, Run and enter regedit. Go to the HKEY_LOCAL_MACHINE SOFTWARE key on the left and then right-click AVG and delete it. Finally, quit the regedit and reboot your computer. Free AVG will be totally uninstalled from your system.

How to fully uninstall free AVG security program in a specific method?

Do you still have no idea to completely uninstall free AVG antivirus software? Is it difficult for you to follow the uninstall guides above to get rid of the software? In fact, there are professional program uninstall tools to help you fix the problem. They are specially made to handle the software removal problem. Perfect Uninstaller is one of the best software uninstallers. It enables you to delete all unwanted programs with the powerful utility called “Force Uninstall”.
Still can’t fully uninstall free AVG? Try Perfect Uninstaller (It is 100% guarantee!)


2013-12-16

SweetPacks Uninstall - How to Remove SweetPacks Toolbar from Firefox (Toolbar Removal Instructions)

Have you been tired to remove SweetPacks toolbar from Firefox?
Have you tried to get rid of SweetPacks which is considered as virus? But it keeps come back.
You might search many SweetPacks removal tips in yahoo answers or wiki answers forum. However, you are failed. This is so annoying. In fact, even though it is not a virus, it also corrupts your Firefox. The error messages frequently pop up. This doesn’t allow you to delete the toolbar. Fortunately, you can learn how to fully remove SweetPacks toolbar step by step in this article as following.

What is SweetPacks toolbar?

SweetPacks toolbar is free browser add-on (toolbar) that offers a lot of fun elements such as dynamic expressions, free games, and weather report. It is ad-supported program, when install it, you are supposed to install extra elements, such as search assistant BHO, Toolbar BHO, sweetim search engine and home.sweetim.com startup page.

How to get rid of SweetPacks toolbar from Firefox?

Uninstall SweetPacks from Windows Control panel.

1. Click Start Menu, and select Control Panel.
2. Locate “Add/Remove Programs” from the Control Panel. If you are using Windows Vista/7 users, this will be called “Programs/Features”.
3. Select SweetIM Bundle by SweetPacks from the listed programs, and click “Uninstall/Remove” button.

How to delete SweetPacks through the Reset Firefox feature?

Reset Firefox can fix many issues by restoring Firefox to its factory default state while saving your essential information. Note: This will cause you to lose any Extensions, Open websites, and some Preferences.
To Reset Firefox do the following:
Go to Firefox > Help > Troubleshooting Information.
Click the "Reset Firefox" button.
Firefox will close and reset. After Firefox is done, it will show a window with the information that is imported. Click Finish.
Firefox will open with all factory defaults applied.
Go to Tools Add-ons, switch to Extension tab, search and select SweetPacks Toolbar for Firefox  and click onRemovebutton.
If you are not sure that you can handle the toolbar removal processes above, it is recommended you to try the uninstall tool software. All toolbars and programs are listed on the display window of the uninstaller. Perfect Uninstaller enables you completely uninstall all annoying toolbars from your browsers with troubles. You can totally get rid of the toolbar in 3 steps.
1.Quit Firefox and any other processes related to SweetPacks
2.Download and run SweetPacks uninstalltool
3.find SweetPacks in the programs'list on the interface of Perfect Uninstaller and click "Uninstall" button

2013-12-12

Can’t Uninstall Weather Bug – How Do You Delete Weather Bug in Windows 7 When It Won’t Uninstall?

Can’t uninstall Weather Bug in Win 7 as the error message popup?
Do you feel disappointed that Weather Bug won’t uninstall when you try to delete it in Control Panel?
Do you have problem to remove Weather Bug and it will not uninstall? You might try to locate the file, then right-click it to delete the file. And the folder of program will disappear. But it doesn’t mean you have fully delete Weather Bug. There are many related registry files stored around your system. You can’t see and manually delete them if you don’t know any skills about computer. Thus, in this article, you will learn the most effective program removal guides to get rid of Weather Bug with ease.

What is Weather Bug?

WeatherBug is a brand owned by Earth Networks, based in Germantown, Maryland, that provides live weather data and maintains a mesoscale network of (at last count) 8,530 weather stations.

How to totally uninstall Weather Bug in Windows 7?

Even though the program is helpful, you have to delete it when you need to upgrade and re-install it. So you need to follow the program removal tips below:
Open Programs and Features by clicking the Start button, clicking Control Panel, clicking Programs, and then clicking Programs and Features.
Select a Weather Bug, and then click Uninstall. Some programs include the option to change or repair the program in addition to uninstalling it. But many simply offer the option to uninstall. To change a program, click Change or Repair. If you are prompted for an administrator password or confirmation, type the password or provide confirmation.
If the processes do not work well, you need to go into Safe Mode to follow the above removal guides again. What’s more, to make sure you have finished the job, you have to remove Weather Bug related files and registry keys.
1. Open Windows Search to search for every files related to Weather Bug like: C:\Programs Files\ Weather Bug
2. Click on Run icon on the Start Menu, then type regedit to activate the Registry Editor. Find and delete those related keys like:
HKEY_LOCAL_MACHINE\Software\ Weather Bug
HKEY_LOCAL_MACHINE\Software\ Weather Bug.exe
In the end, you need to restart your computer. And the program will be fully deleted.
Obviously, if you follow the steps above, you can definitely uninstall Weather Bug from your computer. But if you fail to conduct a step correctly, your computer will crash immediately. What’s worse, your system might be destroyed. To avoid this mistake, it is recommended you to use a professional uninstall tool named Perfect Uninstaller to help you totally remove Weather Bug with ease. With its technical function, you can easily uninstall any unwanted programs completely, without any files or entries left over.

Unable to remove Weather Bug? It is 100% guarantee by using Perfect Uninstaller.

2013-12-11

Can’t Uninstall Conduit Toolbar? How to Totally Remove Conduit from Google Chrome (Removal Instructions)

Are you so tired in uninstalling Conduit because it won’t allow an uninstall and it won't allow updates to this program?
Are you frustrated to remove Conduit when you get error messages that tell you a component in Conduit is missing?
In this article, you can learn the step-by-step software removal guides to get rid of Conduit. It is not difficult to handle that issue.

What is Conduit Toolbar?

The Conduit Toolbar is a custom search toolbar that allows you to search for content such as pictures, videos, research and services on the Internet. A customized Conduit Toolbar can be branded with a business logo and include your favorite links and search engines. If you do not use it, removing a customized Conduit Toolbar is like removing any other program through the Windows operating system.

How to fully remove Conduit Toolbar from Google Chrome?

Start Google Chrome, click on Settings icon (Located in very top right side of the browser), Under this menu find out and click on Settings after clicking on that you will appear a configuration page.
In the same configuration page find an option named as “Open a specific page or set of pages” click on Set Pages, here you will appear the bunch of URL (Set pages), you have to delete all them and enter only one which you want to use as your home page.
In the same configuration page find out the option named as ‘Manage search engines’ click on that, then you will get a page as Default search engine settings, here you will get some bunch of search engines, first of all change your default search engine. Click the Chrome menu button, then select Settings and click on One the New Tab page in the On Startup section.
1. Open Google Chrome.
2. Click on the Customize and control Google Chrome (3-Bars Icon) located on top right corner of the browser.
3. Select Settings from the drop-down list.
4. Once on the settings page, click on Show advanced settings... at the bottom of the page to see the rest of the Chrome setup.
5. Locate Privacy section and mark 'Enable phishing and malware protection'.
6. Please restart Google Chrome. New settings keep your browser safe while surfing the web.
Is it complicated for you to handle the Conduit Removal Guides above? As a matter of fact, there is also an easier and more effective removal method to totally uninstall Conduit Toolbar from Chrome. Perfect Uninstaller is an uninstall tool which specially produced to delete all unwanted programs from your computer without any traces.
Can’t uninstall Conduit toolbar? Try Perfect Uninstaller ( 3 steps only) 

2013-12-09

Can’t Uninstall McAfee in Windows 8 – How Can I Totally Delete McAfee If I Can’t Manually Remove It

Can’t uninstall McAfeein Win 8? You might want to delete McAfee Security so that you can try other antivirus software to protect your PC. However, you are not able to fully Remove McAfee in Control Pane. As usual, in order to fully get rid of the program, you need to spend lots of time restoring your operating system to avoid some system errors and leftover files. Are you tired that you couldn’t delete McAfee Internet Security antivirus due to there is no uninstallation option in the programs’ list of Start Menu? Thus, you need learn some removal tips in this article.

McAfee error message:

Can't get rid of McAfee in Control Panel:

It is complex to fully delete McAfee from Window 8

And you might find McAfee was unable to be removed from your computer. But, you couldn’t use it anymore because you cannot reinstall it if you can’t remove it firstly. McAfee, is a professional Antivirus software, is free diagnostic virus tool for your computer that allows you to simply and easily check your software, firewall protection, and web security status on your laptop. Unfortunately, you need to get rid of it if it becomes useless.

How to totally uninstall McAfee Internet Security from Windows 8?

As a matter of fact, you can learn two effective ways to entirely delete McAfee from Win 8. And you need to follow the step-by-step guides below.
At the beginning, you can get rid of the program in a normal way for free. Sometimes, even if McAfee works well, you want to try another antivirus program like Kaspersky, Norton or Avast. First of all, you have to be sure that you are the Windows administrator so that you can uninstall McAfee by using “Programs and Features” in the Control Panel.
a. Click Start, and then click Control Panel.
b. Double-click Programs and Features, and locate the program you want to delete.
c. Click “Uninstall” option to follow the procedures provided.
However, this is a normal process. You can’t follow the steps above due to McAfee does not allow and there is no options for you to choose. And you have to go to use the registry editor to clean all files. But, It is not recommended to try this removal way. As we known, it is highly risky to edit registry if you don’t know it.
What is the best solution to completely remove McAfee from Win 8?
There are many McAfee program uninstall tools on the internet. All are so good at uninstalling programs. Perfect Uninstaller is one of the best uninstall tool, which can help you completely remove any unwanted programs or toolbars from your laptop. 

To fully uninstall McAfee, you just need to make a few clicks.

You can also see how to entirely uninstall McAfee with Perfect Uninstaller in the YouTube video below:


2013-12-06

Bandoo Software Uninstall – How Do I Fully Remove Bandoo (Uninstall Instructions) in Windows 7

Do you want to uninstall Bandoo in Windows 7? Have you been failed to fully delete Bandoo from your PC? And you might feel frustrated to remove Bandoo due to Win 7 uninstaller can not get rid of it. Whatever you want to delete from your computer, the most important is to remove the related hidden extensions and registry files. Thus, if you are using Windows 7 and you want to get rid of programs for free, you should learn some useful Bandoo removal guides as following.
You could remove Bandoo in standard way (it is definitely free). So you can follow the step-by-step instructions. At the beginning, you need to click “Start Menu” > click “Control Panel” > find and click “Programs and Features” > locate the program you want to remove on the programs list. > click “Uninstall” button. On the pop-up screen, you need to follow forwards the processes. And Bandoo will be uninstalled from the programs list. Unfortunately, you might find there is some related error message pop-up after you restart your computer. Thus, you have to delete the hidden files by following the uninstall guides very careful.
Click Start Menu > Click Run > Type “Regedit” > Click “YES” to access Registry Editor > Click the folder HKEY_CURRENT_USER and HKEY_LOCAL_MACHINE > Search and select all registry entries related to Bandoo > Right-click the files and Select “Delete” option > Click “Delete” to remove the files. And now, reboot your PC. The Bandoo has been completely deleted.
The program removal instruction above is good and free. But it is complicated and difficult for you to handle the detailed processes. But, there is another way to uninstall Bandoo completely from your computer. Perfect Uninstaller is a better and easier program uninstall tool. It can help you fully uninstall any unwanted programs and their related files and extensions in 3 steps.
1. Download and install Perfect Uninstaller
2. Locate the program you want to delete.

3. Click “Uninstall” button to fully remove Bandoo from your laptop.

2013-12-05

Can’t Uninstall Eset Smart Security – How Can I Completely Remove Eset Smart Security before Installing 360

You have tried to fully uninstall Eset Smart Security from your PC, but you are not able to get it done. This is a frustrating and annoying Add-on application. There is no option to delete it in Start Menu. Thus, you need to learn some professional ESET removal tips in this article.
In order to play a video game, some the website required that my brother download a plug-in, I think it was Adobe Shockwave. So he downloaded the plug-in, unfortunately it came with Eset Smart Security, which he did not want. He has tried removing it through the Control Panel's "Uninstall a program" feature. However, it reappears the next time he restarts my computer. He even removed all Symantec items from the registry, but Eset Smart Security continues to return. I tried this a second time and after rebooting it was there again. Finally, I do have this program completely off of his computer, with many hard works.
What is the simple way to fully remove Eset Smart Security from your PC?
Since my brother is running on Vista Ultimate, the easiest choice to uninstall Eset Smart Security is to go through Control Panel:
1. Click the Start button, and then click Control Panel.
2. In Windows Vista, click Uninstall a Program (If you are running on Windows XP, double-click Add or Remove Programs.)
3. In the list of installed programs, click Eset Smart Security, and then click Remove or Uninstall.
4. Follow the on-screen instructions to uninstall Eset Smart Security.
Likewise, I have to delete the scheduled task through the “Start”:
Click the Start button, and then click All Programs > Accessories > System Tools > Task Scheduler. Click Task Status. Under Active Tasks, click NSSStub, and in the right pane, under Actions, click Delete. Exit Scheduled Tasks.
But For Windows XP users, to delete the scheduled task you need to : Click Start > All Programs > Accessories > System Tools > Scheduled Tasks. Right-click NSSStub and then click Delete. In the confirmation dialog box that appears, click “Yes”. Exit Scheduled Tasks.
The final but the most indispensable step is to delete a registry key that contains information of the Eset Smart Security. However, to Windows registry is never an easy task and you need to back up the registry before you make any changes to it since incorrect changes to the registry can result in permanent data loss or corrupted files. In that regard, you should only modify only the specified registry key as such:
HKEY_LOCAL_MACHINE\Software\Microsoft\Windows\CurrentVersion\RunOnce\NSSInstallation
The most effective way to delete Eset Smart Security in Windows
If unfortunately this manual procedure refuses to get rid of Eset Smart Security from your programs list or you get "Internal Error 2753. Nss.exe" during the removal, this can be due to the fact that it simply failed, or there are some files left on your registry and on your hard-drive that are Norton related. So, what do you need to do now to uninstall and to remove Eset Smart Security from your computer? The best option that you can do in order to successfully to get an uninstall tool. Perfect Uninstaller can fully uninstall Eset Smart Security from your laptop by 3 easy steps that are automated.

Firstly, download Perfect Uninstaller and start to uninstall Eset Smart Security.
Once that has been done, the uninstaller will scan both your registry, and your hard-drive.
If the Perfect Uninstaller found any related files of Eset Smart Security, then it will delete them immediately.
Can’t manually uninstall Eset Smart Security? Download Perfect Uninstaller. (Recommended)

2013-12-04

How Can I Totally Uninstall Directx 11 When It Is Corrupted and "Add or Remove Programs" Can't Delete It?

Are you in troubles on trying to uninstall Directx from your PC?
Is it risky to manually uninstall Directx from your laptop?
Don't worry too much about it for now as after you read this page you will at least know how to fix your problem and at best you will have your problem solved so yo can go back and get on with playing your games the way you used to (... without any problems.)

When Leo Notenboom the famous and popular "internet Geek" and "Mr. know it all" from www.ask-leo.com was asked by a gamer who was having problems with Direct X "How can I uninstall Directx 9?"

His simple answer was and I quote:

" To the best of my knowledge you can't. Once installed, it becomes part of the operating system. If you need to uninstall then a Google search for "Directx Uninstall" returns several hits, but I can't speak for their quality. Ultimately, the approach I would try would be to re-install the operating system and then not install Directx 9."

Now, I don't know about you, but uninstalling a whole operating system then re-installing it really isn't that simple, for internet Geeks it maybe so but definitely not for the majority of computer users.

Here's the Directx uninstaller if you want to download it now, but you can read on to learn more on how to completely uninstall Directx from your PC, without the need to uninstall your Windows Operating System, whether it maybe (Windows XP, Windows Vista or Windows 7).
Remove Directx The Easy Way From Your PC.
If you are reading this page here, there is a chance that you are having the same type of problems so many others seem to be having on how to uninstall Directx from your PC without having to uninstall your Windows XP, Windows Vista or even Windows 7 operating system.

One of the main disadvantages of Directx 8, Directx 9, Directx 10 and Directx 11 is that there is no official method to uninstall them from your PC. Obviously Microsoft doesn't want you to uninstall their product from your PC, just in case you decide to download competings gaming software. And that's where a lot of people start having with all sorts of problems trying to remove Directx.

For instance Directx 8, by default is packaged with Windows XP; Directx 9 is also packaged with Windows XP and Windows Vista; Directx 10 was shipped with Windows Vista and now Directx 11 comes packaged with Windows 7. What makes matters confusing and one starts to get in all sorts of problems is when PC users and gamers end up with a more advance Operating System than the one their games is designed for.

So the best way to get around the problem is to uninstall Directx using the "Perfect Uninstaller". This special software will allow you to uninstall ONLY the Directx version that is causing all the problems.


Why do you prefer Perfect Uninstaller?

Aside from working to uninstall Directx, the Perfect Uninstaller will actually get rid of other non-working programs from your computer. To give you an idea about why it pays to use programs like the Perfect Uninstaller program, take a look at the following benefits that it provides:

1. Perfect Uninstaller can completely uninstall programs which cannot be removed by the standard (Add/Remove) applet in Windows.

2. It completely gets rid of empty or corrupted registry entries.

3. It forcibly uninstalls corrupted or hidden programs.

4. It restores registry files to the previous working session.


With all these functionalities and more, it is no wonder why uninstall tools like the Perfect Uninstaller are used by computer users who would like to remove Directx. It can also completely remove other non-working programs like Internet Explorer, Microsoft Office, Norton or Trend Micro antivirus and similar hard to uninstall programs.

2013-11-29

Uninstall Search Donkey – How to Successfully Remove Search Donkey from Chrome, Internet Explorer and Firefox?

Do you decide to fully uninstall Search Donkey from Chrome?
Search Donkey is a browser add-on, which can get inside the system either with or without user's permission asked. Thus, it is necessary to uninstall Search Donkey from your Google Chrome due to it eats up many resources of your system. It is disappointed that you have tried to uninstall Search Donkey, but it still appears when you open your browser. And pop-up ads from Search Donkey keep appearing on your web browser when you highlight a key word. You could not remove it in normal way. So, you have to learn the effective and easy uninstall guides to solve the problem. And, you could follow the Search Donkey removal instructions as follow.
At the beginning, in order to completely uninstall Search Donkey, you should disable it. And then, you need to close Chrome. Next, you should using the “Add or Remove Programs” in Control Panel. The detailed step-by-step instructions are below.
Go to click “Start Menu” > Control Panel > Add or Remove Programs > locate Search Donkey in the programs list > “Change or Remove” button > on the pop-up screen, follow the Next steps to finish the job. But, the Search Donkey will disappear for a while. When you browse IE, it might be still there. That’s the uninstall guides for Windows xp. However, that is similar with Windows Vista or Windows 7. The difference between them is that “Programs and Features” insteads of “Add or Remove Programs”. Furthermore, you need to delete all related files about Search Donkey. And you have to follow the removal tips carefully below.
Click Start Menu on the left corner > Click Run > Type “Regedit” > Click “YES” to open Registry Editor > Click the folder HKEY_CURRENT_USER and HKEY_LOCAL_MACHINE > Search and click all Search Donkey registry entries > Right-click the files and Select “Delete” option > Click “Delete” to clean up the registry files.
Caution: If you lose some important files during you edit the registry. And your system is not safe and stable now. Windows might be destroyed. You have to re-build it.

To totally uninstall Search Donkey and avoid any troubles, you could try to use uninstall tool. It is specially produced to handle the software removal problems. Perfect Uninstaller is an expert on uninstalling programs. “Force Uninstall” is the most powerful and fantastic function. It is 100% guaranteed to get rid of Search Donkey from your Firefox with ease.

2013-11-26

How to Uninstall Google Music Manager if I Can’t Totally Remove Music Manager for Windows

You might be so frustrated about "There is no way to fully uninstall Google Music Manager on your Windows". When you delete it from applications and it still showed up ever time you started up the PC. And this makes you get a slow computer.Too many auto-run programs added to Startup may be the major cause of a slow Windows PC. You might have searched how to completely remove it, and did that. But, you failed. In order to avoid this annoying trouble, you need to learn how to totally uninstall Google Music Manager step by step below.

How to get rid of Google Music Manager by manual?

Click Windows key or Home key + R key to open up "Run" application. Input MSCONFIG or msconfig in it, then you click OK button on Run.

Select the Startup option on System Configuration.

Find and disable Music Manager item on that list by cancelling the checkbox for it and then clicking Apply and OK button. What's more, if you're willing to manually upgrade other Google product, such as Google Chrome, you can also disable the Google Update project listed.

Click "Restart" button on System Configuration. Or you can select the option Exit without restart.
If you want to delete Google Music Manager in Control Panel, you can follow or review the steps below.


Click on Start button in Taskbar, and then click Control Panel link and then Programs - Programs and features - Uninstall or Change a program.


Double click on Music Manager program installed list.
You can click Show details to learn more on the automatic removal process; and then you click Close button on Music Manager Uninstall: Completed window.
For advanced users, you can manually detect and remove Google Music Manager remains through go into Registry Editor; and for more common users, run an uninstall tool to safely and fully uninstall Google Music Manager from Windows without any traces.After trying the manual removal procedures or the Music Manager uninstaller, you will find that the Google Music Manager is still in your system. In that case, you should use an uninstall tool to run a clean removal for you. There are many professional uninstall tool for you to choose. As one of the most excellent uninstall tools, Perfect Uninstaller performs perfectly in many tests, and a very useful feature of Perfect Uninstaller is that they can force uninstall these hidden files.
Can't remove Google Music Manager? Try Perfect Uninstaller(It is 100% guarantee!)

2013-11-25

How can I uninstall VAIO Messenger when I can't uninstall VAIO Messenger in Win 7?

Are you desired to totally uninstall VAIO Messenger from your Sony laptop because it slows down your laptop?
Are you annoyed to delete VAIO Messenger due to it causes rectangular black screen to pop up saying that VAIO Messenger has stopped responding?
In this article, you can completely get rid of it with ease. Before you try to remove VAIO Messenger, you should disable it as VAIO Messenger will still be running in the background. So you need to close it in the Task Manager. And next, you can follow the removal guides below:


There are two programs you must uninstall in order to completely remove VAIO Messenger from your laptop. They are VAIO Messenger, and Oasis2service, the service which delivers updates to VAIO Messenger.
If you uninstall VAIO Messenger and the associated service, you will no longer be able to receive critical messages from Sony regarding your PC.
You can try to delete VAIO Messenger and the Oasis2Service from the Programs and Features section of the Control Panel in Windows 7.

1) Click on Start menu button and select Control Panel, then select Programs & Features
2) In Programs and Features, click on VAIO Messenger to select the application.
3) Click on Uninstall to uninstall VAIO Messenger.  [A webpage for DDNi will launch in a browser window I just simply closed it, and notice the uninstall program is still in progress.]
4) Click on Oasis2Service to select this service.
5) Click on Uninstall to uninstall Oasis2Service.
6) Once uninstall is completed, it is recommended you to reboot your PC.
However, Usually there are some leftover files stored in your system. You are not able to delete it through Control Panel. Thus, you need to manually delete them by using Registry Editor. But, it is not recommended you to try this method as once you remove the wrong registry file, your system will be destroyed.

In this case, you can install and run Perfect Uninstaller to properly remove any remaining unused registry key entries and all other needles crap that's taking up space and resources on your computer. If you can't uninstall VAIO Messenger, you can forcibly uninstall it by using the "Force Uninstall" function of Perfect Uninstaller. You can also see how it works well in YouTube below:

2013-11-20

How Do I Uninstall TomTom Home from My Laptop If I Can’t Manually Delete It in Windows?

Did you try to totally uninstall TomTom Home in Standard Way? But you could not get success.
You might feel frustrated that you have deleted TomTom again and again, but it was still there.
The error message was coming up and you can’t remove TomTom by using “Add or Remove Programs”. And the error messages frequently pop up on your computer screen.
Are you confused that sometimes you want to get rid of the program by using the standard way but you can’t find the “Uninstall” option on All Programs? In this case, what are you supposed to do? Re-build your Windows system? It will take so much time. In fact, if you carefully follow the software removal guides below.
Do you want to delete TomTom Home when it gets error or corrupted?

How to completely remove TomTom Home with usual removal way?

As a matter of fact, most of you would like to delete programs in the standard way which is using “Add or Remove Programs” in Windows XP or “Programs and Features” in Win 7 or Windows Vista. Thus, you should click “Start Menu” and then go to the Control Panel. Next, you click the “Add or Remove Programs” or “Programs and Features”. And then, you will find out the TomTom Home on the programs list and click the “Change/Remove” button. If there is no error, you can normally delete the software. The program will be uninstalled from Control Panel. But, the removal guides have not been completed. There are many related files and extensions which are stored all around your PC. You are not able to get rid of them with this uninstall way.

Now, you might have no idea to fix the software removal problem. If you are a computer technician, you can manually clean up the Windows registry entries to confirm the application that have been fully uninstalled. But, it is so complicated for most of you to edit the registry data so that it not recommended you to remove TomTom by manual.  
In order to save your time and money, it is an amazing uninstall tool like Perfect Uninstaller. It is specifically made to help you totally uninstall any unneeded programs.

How to totally uninstall TomTom Home if you can’t delete it with “Program and Features”?

Is it complicated to uninstall TomTom Home using “Programs and Features” in Windows 7? Are you confused about deleting the related files and extensions? Perfect Uninstaller will help you entirely remove TomTom and all its related information with no difficulties. And you can handle all application removal issues. It is 100% guaranteed!

Perfect Uninstaller Reviews – What Do You Think about Perfect Uninstaller in Your Mind?

Perfect Uninstaller is one of the most powerful software removal tools which can help users totally delete any unwanted applications in the computer. It is not only easy to use, but also is useful to solve problems.
Have you ever felt annoyed when you tried to uninstall an unwanted program like corrupted Kaspersky antivirus program, but you failed because there were many related leftover files in your PC? You might think that you can delete unneeded applications through “Add or Remove Programs” in Windows XP. Unfortunately, you could not find the unwanted software in the programs’ list. In this case, the software could not be deleted by using the normal removal way. Fortunately, Perfect Uninstaller is specially produced to handle program removal problems. It can forcibly delete the program and its related extensions without traces because it can automatically scan and clean up the related files during the processes of software removal. Thus, if you encounter the troubles like above, it is recommended you to use Perfect Uninstaller to solve the problems.
There are three steps for you to fully delete a program:
Start up Perfect Uninstaller
Locate the program that you want to delete
Click “Uninstall” button to follow the onscreen processes and the program will be gone soon.

Meanwhile, you can also learn how to forcibly uninstall a program step by step. Just follow the software removal instruction on my YouTube Chanel. You will find it is not difficult to totally remove any unwanted program with Perfect Uninstaller.

2013-11-19

How Can I Fully Remove Alot Toolbar When It Is not Good for Me?

Have to remove Alot Toolbar? My sister downloaded the Alot program but found she didn't really like it. It said to uninstall it go into control panel and click on Alot toolbar and it would uninstall. She can’t even find it in her control panel list of programs, but it does show as a toolbar in her Firefox browser. She needs suggestions on how to remove it? And now, I find some good uninstall tips for you to learn as below: 
Is it easy to remove Alot Toolbar from Control Panel?
Click on Start, Settings, Control Panel
Double click on Add/Remove Programs
Find "ALOT Toolbar" in the list of installed programs and click on Change/Remove to uninstall it.
Follow along with the prompts to complete the uninstalling.
The Alot toolbar should now be completely uninstalled from your computer.
But, to completely purge Alot program from your computer, you need to delete the files, folders, and Windows registry keys, and registry values associated with Alot. These files, folders, and registry keys are respectively listed in the Files, Folders, Registry Keys, and Registry Values sections.
How to remove the Alot registry keys and values:
On the Windows Start menu, click Run.
In the Open box, type regedit and click OK.
The Registry Editor window opens. This window consists of two panes. The left pane displays folders that represent the registry keys arranged in hierarchical order. The right one lists the registry values of the currently selected registry key.
To delete each registry key listed in the Registry Keys section, do the following:
Locate the key in the left pane of the Registry Editor window by sequentially expanding the folders according to the path indicated in the Registry Keys section. For example, if the path of a registry key is HKEY_LOCAL_MACHINE\software\FolderA\FolderB\KeyName1, sequentially expand the HKEY_LOCAL_MACHINE, software, FolderA, and FolderB folders.
Select the key name indicated at the end of the path (KeyName1 in the example above).
Right-click the key name and select Delete on the menu.
Click Yes in the Confirm Key Delete dialog box.
If this removal process seems too difficult for you, you should employ a professional uninstaller tool to help you get rid of the Alot programs. Currently, the most specified removal software for Alot is Perfect Uninstaller. With Perfect Uninstaller running on your computer, all the components of Alot program will be recognized and will be removed instantly with a few clicks!

You can also learn how to force uninstall a program with step-by-step guides in my YouTube Chanel below:

2013-11-18

What Can I Do to Completely Uninstall My Web Search Toolbar As I Can’t Delete It by Manual?

I was frustrated to manually uninstall My Web Search toolbar from my PC. I had no idea to get rid of it. By now, I have solved the problem easily. And do you know how?
How do you uninstall my web search from your toolbar? The My Web Search toolbar is a precisely customizable toolbar that installs directly onto your Web browser. It is often installed when you download software from the “Fun Web Products” line. Its design allows you to Search from anywhere on the Web using the Internet's leading search providers; add free "cool tools" such as PopSwatter, Smiley Central, Popular Screen savers, and Cursor Mania My Info button.
Despite the fact that these applications are not spyware, it somehow uses up memory and slow your computer down. Now just follow the simple instructions and the My Web Search toolbar will be uninstalled.
Close all open Web browsers.
Click on “Start” and choose “Control Panel.”
Click on “Add/Remove Programs” if you are a Windows XP user. Windows Vista and 7 users should click on “Programs and Features.”
Find the My Web Search toolbar in the list of programs that are installed on your computer. The toolbar may also be installed under the name “My Search Bar,” “My Web Search Bar,” “Search Assistant” or “MyWay Speed Bar.”
Click on the toolbar name once to highlight it in the list, then click the “Remove” button to uninstall the program.
Reboot your computer to allow changes to take effect.
How to fully remove remaining files of My Web Search toolbar?
Click on the “Start” button and choose “Computer” from the Start menu.
Double-click your main hard drive. This will usually be the “C” drive.
Double-click the “Program Files” folder.
Locate the folders named “FunWebProducts” or “MyWebSearch.”
Right-click on the folders and choose “Delete” from the menu to remove them.

You can easily uninstall the My Web Search toolbar using the instructions above. Should you reopen your Web browser and still see the My Web Search toolbar, you may need to restart your computer for the uninstall process to be completed. You can also run Perfect Uninstaller once you have removed the files and processes to remove any other files or registry keys that might still be left on your computer. It is recommended that you use Perfect Uninstaller when you start to eliminate My Web Search toolbar completely with a few clicks as instructed.
Run the uninstall tool on your computer

Select or insert the option, Show Windows installer, on the main panel of Perfect Uninstaller as attached. Click any components of My Web Search toolbar (you can see) on the program list of Perfect Uninstaller.  Click Uninstall to start the removal.

2013-11-08

Can’t Uninstall McAfee in Windows 8 – What is The Best Way to Totally Delete McAfee Security Center?

Can not uninstall McAfee in Win 8 from your computer when it works not well after you update Windows?
Are you desired to fully uninstall McAfee and its invalid registry entries?
Are you feeling tired of wasting so much time to get around popping up errors of this program? 
Don’t worry, there are some clear and useful McAfee removal tips in this article to help you fully get rid of it. As a matter of fact, McAfee antivirus is security software that provides users protection against viruses, spyware, Adware and other internet threats that can compromise their privacy and destroy their PC. Recently, it has also been developed to keep kids safe online with parental control software by blocking or filtering inappropriate content, Spam websites and monitoring internet usage. However, once it is installed into your Windows system, McAfee will be embedded with many files in your system or leave traces to multiple folders. So, it would be a big headache when it is stop working or corrupted because you can not completely delete McAfee and the related files. However, you could carefully follow the software uninstall guides to remove the program.

McAfee error message when you failed to delete it.


How can you entirely remove McAfee from Windows 8 in steps?


Technically, what you need to do is how computer technicians remove programs for you when the standard removal way is unavailable. That is manually uninstalling McAfee antivirus. However, it's a very risky method to use, especially if you haven't done it before. Deleting the wrong file could cause disaster for your computer... which is why it's recommended that you could try to use an uninstall tool to safely and totally remove the programs. We've found one of the best software uninstallers is called Perfect Uninstaller.
To fully uninstall McAfee security center when the standard uninstaller can't work, you may have to follow the instruction to manually and forcibly uninstall the directories of it as following.
C:\WINDOWS\system32\isafeif.dll
C:\WINDOWS\system32\isafprod.dl
C:\WINDOWS\system32\vetredir.dll
C:\WINDOWS\system32\KeyHelp.ocx
C:\WINDOWS\system32\spmsg.dll
C:\WINDOWS\system32\UmxWNP.dll
C:\WINDOWS\system32\UmxSbxExw.dll
C:\WINDOWS\system32\UmxSbxw.dll
C:\WINDOWS\system32\msxml4.dll
C:\WINDOWS\system32\msxml4r.dll
C:\WINDOWS\system32\drivers\veteboot.sys
C:\WINDOWS\system32\drivers\vetefile.sys
C:\WINDOWS\system32\drivers\vet-filt.sys
C:\WINDOWS\system32\drivers\vet-rec.sys
C:\WINDOWS\system32\drivers\vetfddnt.sys
C:\WINDOWS\system32\drivers\vetmonnt.sys
C:\WINDOWS\system32\drivers\KmxCF.sys
C:\WINDOWS\system32\drivers\KmxAgent.sys
C:\WINDOWS\system32\drivers\KmxCfg.sys
C:\WINDOWS\system32\drivers\KmxStart.sys
C:\WINDOWS\system32\drivers\KmxFw.sys
C:\WINDOWS\system32\drivers\KmxFile.sys
C:\WINDOWS\system32\drivers\KmxSbx.sys
Although this method is a very powerful way to remove any program from your computer, you need to be very cautious when you apply steps for forcible uninstall. If you follow the steps above, you can surely uninstall McAfee from your computer. But if you fail to conduct a step correctly, your computer will crash or be destroyed immediately.

How to completely uninstall McAfee antivirus from your laptop with Perfect Uninstaller?

In the mean time, only the fully authorized Perfect Uninstaller can force uninstall all the files and folders of McAfee directly and scan the left over registry entries and get them cleaned up. Using Perfect Uninstaller is a much easier and safer resolution to help you completely get rid of McAfee in seconds, with hassle free. It is actually a fantastic removal tool that can help you fully remove McAfee Antivirus program with great success and make sure all the defunct registry entries and related files are eliminated automatically with a few clicks. 
Can't remove McAfee Security Center? Try Perfect Uninstaller now!

You can learn how to totally remove McAfee by using Perfect Uninstaller in YouTube: